Mini Exercise #4
MINI EXERCISE #4: ADVANCED MASKING
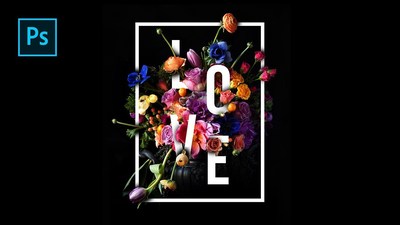
You will create a motivational word or quote in floral or foliage (leaves) typography using masking techniques.
Follow the instructions in one of the these tutorials:
www.solopress.com/blog/print-inspiration/tutorial-create-beautiful-floral-typography-photoshop/
blog.storyblocks.com/tutorials/tutorial-floral-typography-stock-images-photoshop/
https://design.tutsplus.com/tutorials/how-to-create-a-layered-floral-typography-text-effect-in-adobe-photoshop--cms-26315
CRITERIA:
CHALLENGE:
You will create a motivational word or quote in floral or foliage (leaves) typography using masking techniques.
Follow the instructions in one of the these tutorials:
www.solopress.com/blog/print-inspiration/tutorial-create-beautiful-floral-typography-photoshop/
blog.storyblocks.com/tutorials/tutorial-floral-typography-stock-images-photoshop/
https://design.tutsplus.com/tutorials/how-to-create-a-layered-floral-typography-text-effect-in-adobe-photoshop--cms-26315
CRITERIA:
- your main image is high resolution
- the main flowers or foliage are cut out from the background (ie. no people, tables, extra information etc) - keep it clean
- you must have a colour or gradient background
- your font is big enough to mask around (it should take up a significant portion of your image)
- you are using detailed brushes to help get precise edges
- you are zooming in and out to make sure that your image looks good as you hide (mask) portions of the letters
CHALLENGE:
- add a border
- add a shadow onto the letters
- add a shadow behind the flowers
Mini Exercises #1-3 DUE BY
We will begin by exploring Photoshop and it's powerful tools. In order to be successful in using the program, you must first learn what it can deliver.
READ:
PHOTOSHOP REFERENCE GUIDE: TAKE A LOOK!
ALTERING THE CONTENT OF AN IMAGE
CUTTING OUT IMAGES
1. Here is a great tutorial on the 3 easiest ways to cut out images in Photoshop
2. Another faster paced tutorial is here Another guide covering all of the ways to cut out an image
3. Try out this mini tutorial to practice using the PEN TOOL. Find a high res image of a banana to cut out
THE FOLLOWING 3 MINI EXERCISES ARE DUE BY SEPT 19:
MINI EXERCISE #1: BUILD A BURGER:
USING THE SELECTION TOOLS AND BUILDING LAYERS IN SEQUENCE
"Build a Burger" (it's pretty delicious!). You will search for online images to select, cut and paste to build a burger. This exercise will help you understand building layers in sequence.
HAND IN both the PSD and JPG files. Student Resources-->STEVENS Hand In
MINI EXERCISE #2: SHAPES AND LAYERS
SHAPES AND LAYERS: GETTING FAMILIAR WITH LAYERS/COLOURS/GRADIENT/OPACITY
You will create a fun layered collage using multiple shapes to get familiar with working in layers and how they work together. You will play around with tools, gradients, fills, opacity, and rotating shapes using the transformation tool (CTRL T). You will create a collage with at least 10 different shapes showcasing different colours, gradients and opacity changes.
1. New document - 8x10 inches
2. Add a series of triangles or other geometric shapes to your canvas, rotate some in different angles
3. Fill each shape with a different colour or gradient
4. Play with the opacity for each shape LABEL each layer
5. Move the layers UP and DOWN on the layers palette to see how it changes your collage
6. Save as a Photoshop document and a JPG document. You will only hand in the JPG. Student Resources-->STEVENS Hand In
MINI EXERCISE #3: MASKING
THE POWER OF MASKING - NOT DESTROYING PIXELS!
1. We will watch this tutorial together as a class. Re-watch it again for reminder instructions.
2. Read and follow the instructions on MASKING 101
3. Now you are going to LEVITATE! Here is the handout for this exercise.
| howtolevitateinphotoshop.pdf |
***YOU MUST GO AND TAKE CURRENT PHOTOS SOMEWHERE IN THE SCHOOL FOR THIS ONE!***
MARKS FOR MINI EXERCISES: /30
MARKS FOR MINI EXERCISES: /30


